We’re being tracked by everyone and everything, and in most cases through our most intimate possession: our phone. Your calculator probably doesn’t need access to your location or photo album. You may not realize it, but many apps like this have too much access to your personal information. Why? Because your data is an asset for these companies; they can sell it, use it to sell to you, or abuse it if they are cyber criminals.
Here is how to find out who is monitoring you with tips to secure the information on your phone.
Step 1 - Let’s start with finding out which apps have access to your information
Go to -> Settings -> Privacy -> App Privacy Report and Turn it On
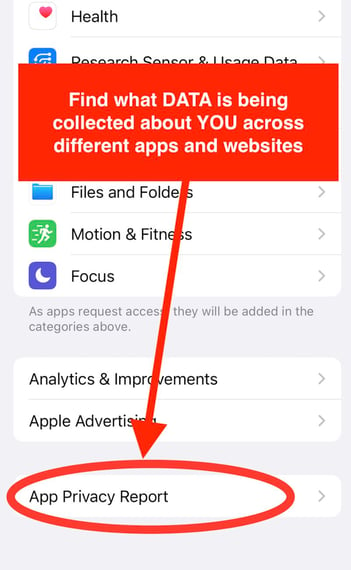
Once this is turned on, your iPhone will start gathering information as you use your device. It will show you which apps have access to your location, photo album, contacts, microphone and more. It will also show you what third-party services, domains, apps and websites you visit that are collecting or sharing information about you.
Step 2 - Now let’s start limiting these apps from collecting your data
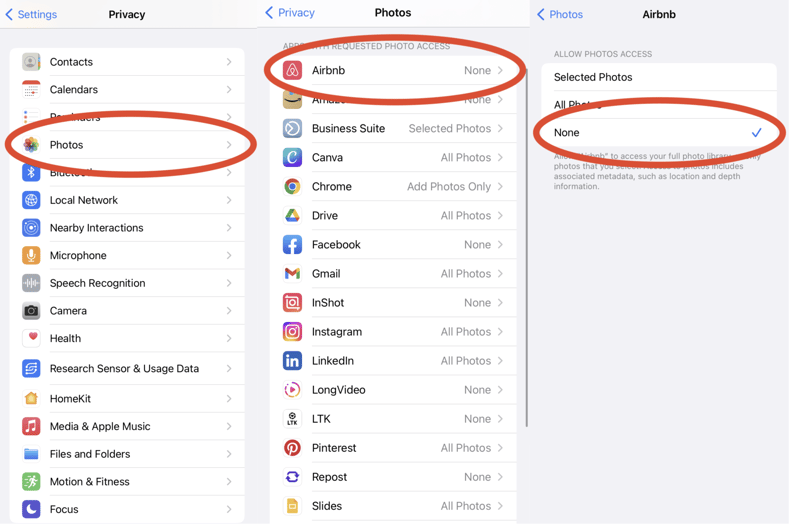
Start with your Camera Roll:
This is very important because if you use your phone to snap pictures of sensitive documents, say your driver’s license or COVID vaccination card, and unbeknownst given apps access to your photo album, they will now have access to these documents.
So, Go to Settings -> Privacy - > Photos -> Check which apps have access to your photo album -> Toggle ON or OFF the access
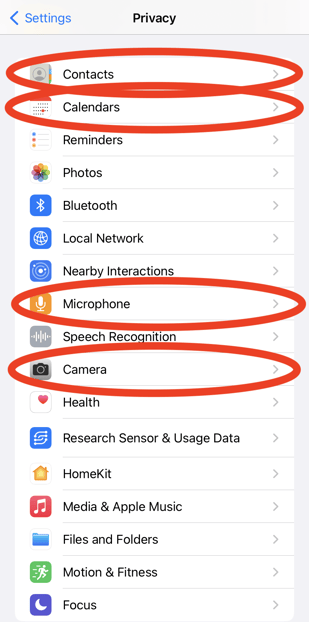
Now do the same of Contacts, Calendar, Microphone, and Camera
Go back to Settings -> Privacy -> and go into Contacts, Calendar, Microphone and Camera and Toggle ON or OFF the access.
Yes, this will take a bit of time, but totally worth it! And go back and check these settings once a while, because you may have granted access and forgot to turn it off.
Step 3 - And lets Get rid of tracking our daily route
Your iPhone will use Significant Locations to keep track of places that you have recently been as well as how often and when you visited them to learn places that are significant for you. It will map your route daily and anyone who has access to your phone will be able to view everywhere you’ve been as far back as a few years.
Go to Settings -> Privacy -> Location Services -> System Services -> Turn Off Significant Locations

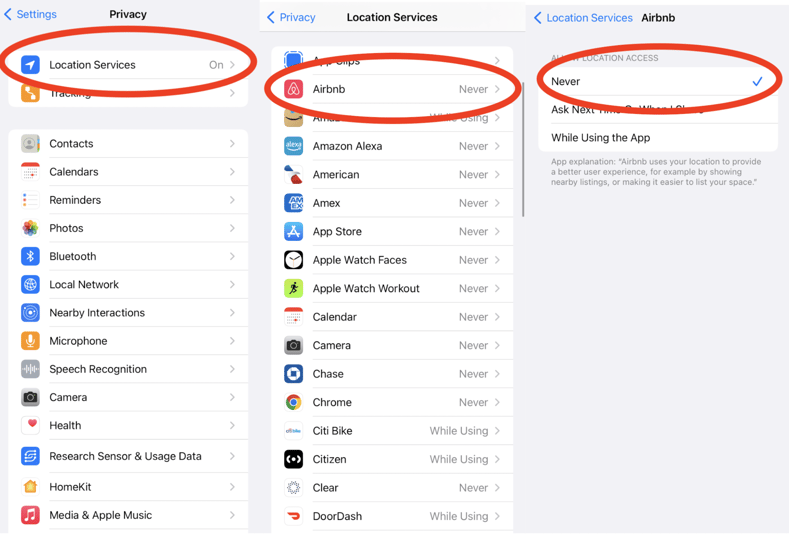
Step 4 - Next, let’s disable Individual apps from tracking you
Some apps may need to know where you are, like google maps and that may make sense for you, however for other apps it make not make sense. So how do you know which app is tracking you? It's easy.
Go to Settings -> Privacy -> Location Services -> App -> Choose which Location Access you allow
Another useful setting that you may want to enable, is that status bar icon that will notify you when an app or a service is tracking your location. This icon will be displayed next to the time at the top left of your screen.
- A hollow arrow indicates that an item may receive your location under certain circumstances
- A purple arrow indicates that an item has recently used your location
- A gray arrow indicates that an item has used your location in the last 24 hours
- Here is how to enable it:
Go to Settings -> Privacy -> Location Services -> System Services -> Turn On Status Bar icon
![]()
Step 5 - Next, let’s disable apps from tracking you even when you are not using them
If application tracking is turned on it will allow apps to track you even when you are not using them. For example while you are browsing other websites or using other apps. Apps want this access to learn more about your overall online behavior, but why would we want them to do that? So, lets turn if off!
Go to Settings -> Privacy -> Tracking -> Turn Off
![]()
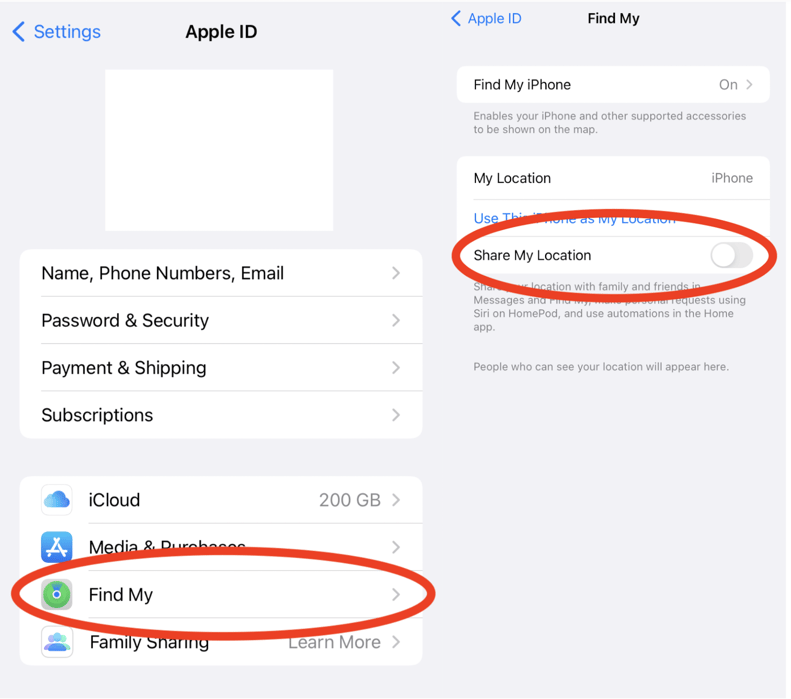
Step 6 - Speaking of, let’s find out if you are sharing your location with friends
Your iPhone allows you to share your location with family and friends. This is a great feature if you want them to see where you’re going and make sure you’re safe. But you might not want them to always have that access, and for several reasons, like if you have an abusive partner.
Go to Settings -> Your Name (top) -> Find My -> Share My Location
Step 7 - for those who want to cut ties with an abusive partner or stalker
In addition to revoking access to your location, Safety Check is a new iOS16 privacy setting that can be useful for those who want to cut ties with an abusive partner or someone stalking them. Many couples know each other's phone passwords, so it's not hard for an abusive partner to secretly configure your device or install spyware to track you without your knowledge. They will be able to know your location, who you communicate with, what you say, and much more. The Safety Check makes it easier to control what information people and apps have access to, including apps like Find My Friends, location, data, contacts, and more. You can also use the Emergency Reset feature, which immediately resets access for all people and apps at once across devices synced with your iCloud account. It also allows you to reset privacy permissions and limit messaging to only the device in their physical possession.
Step 8 - But What If YOU Lose Your Phone Or Someone Steals It?
If someone steals your phone, they will want to take your phone offline so that you can’t find it using the Find My Phone feature. They can do this simply by turning your phone off. However, the moment they turn it back on, it will connect to the internet and ping you its location. In order to disable going offline without turning it off, they will swipe down to view the Control Center on your phone while it's locked and disable the wifi and mobile reception. Once they do this, you will not be able to find it at all. Which is why it's important to disable the Control Center while your phone is locked.
Go to Settings -> “Face ID & Passcode” or “Touch ID & Passcode” -> Turn Off "Control Center"

Step 9 - Now, let’s stop spammers
Spam No More 🤞 Instead of signing up with your regular email, iOS 15 now gives you the option to use a “Random” email (aka “Hidden Email”) instead. Anytime you use that “random” email, Apple will forward it to your regular email. If they start spamming you, got breached, or sold your info, you can just deactivate the “Hidden email” and they will never know your actual email.
How do you enable this new feature?
Than Go to Setting -> Click On your Name at the TOP -> iCloud -> Hide My Email -> And follow the directions.
Step 10 - Set Up A Password On Your iPhone
This doens't require a guide... if your iPhone doesn't have a password, create one ASAP!